
Hello Readers:
I have started this blog to show you Embedded C programming for 8051 family microcontroller using KEIL compiler. The KISS philosophy is used to write this tutorial. What is KISS? Keep It Simple, Stupid!
2. Manipulating Port Pins
This section teaches you how to manipulate port pins bytewise and bitwise.
2.1 Bytewise [all port pins-8bits]
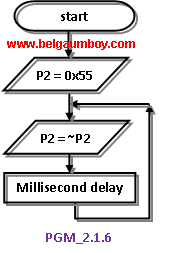
2.1.6 Toggling Port Pins [code optimized]
This program teaches you how to send byte data to any Input/Output ports. Here 0101 0101 and 1010 1010 are sending to Port 2. That means we are toggling Port 2 pins with values 0x55 and 0xAA. This program is code optimized as compared with previous program PGM_215. Note how toggling is achieved with single instruction. Note the code and flow chart diagrams for code optimization effects that mean they are drastically reduced to less number of codes and steps.

Code explanation:
Line 09: Initializing Port 2 to 0x55.
Line 10: This statement creates infinite loop as condition is always true. This is necessary as 8051 is not having any Operating System and it never exits.
Line 12: The compliment of the Port 2 value is send to Port 2 itself. That means initially 0101 0101 or 0x55 [in hex] value is inverted [~ sign] as 1010 1010 or 0xAA and sent to Port 2. For second time 0xAA is inverted as 0x55 and sent to Port 2. This repeats infinitely.
Line 13: The 250 MilliSecond Delay.
After typing the code, press F7 or click Project->Build Target for building the source code. If there are no typical errors file will build successively and shows zero errors and zero warnings.
Now enter into debug mode by pressing Ctrl+F5 or click Debug->Start/Stop Debug Session menu. Our program is toggling between 0x55 and 0xAA numbers in binary form to Port 2 continuously. So we want to watch the Port 2 pins while running this program for toggling values. To get Port 2 tab click Peripherals->I/O Ports->Port 2 menu.
Run the program by pressing F5 or clicking Debug->Run. You can see the toggling values between 0x55 and 0xAA on Port 2 tab continuously in binary form. If you generate HEX file of this program, burn it into your target chip’s memory using suitable uploader and connecting 8 LEDs to Port 2 you can watch LEDs blinking in binary form. To stop running the program press red ‘x’ mark icon or click Debug->Stop.
...till next post bye-bye & take care.


